Setting up an onOffice API user
To enable propform.io to communicate with your onOffice, you need an API user with an API token and secret. This guide walks you through the four steps:
- Create an API user in onOffice
- Grant the API user the correct permissions
- Enter the API token & secret in propform.io
- Assign the API user to an email account + enter the email address in propform
> 🎥 Video overview: In this quick start video, I walk you through all four steps in full.
>
> >
>
>
>
---
>
>
>
>
>
>
>
---
>
>
>
1. Create an API user in onOffice
> Please note: An API user usually incurs costs in onOffice, just like a normal user! If you have an onOffice Enterprise All-In version, an API user is included in your onOffice contract at no extra cost.
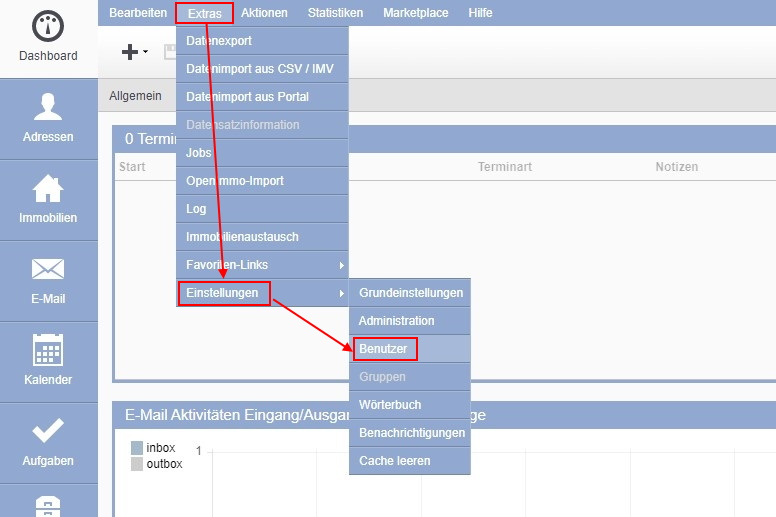
- In the onOffice menu bar, click on "Tools" → "Settings" → "Users".
-
Click on the "+" icon in the top-left corner to create a new user.
-
Under "Save as:", select "API user".
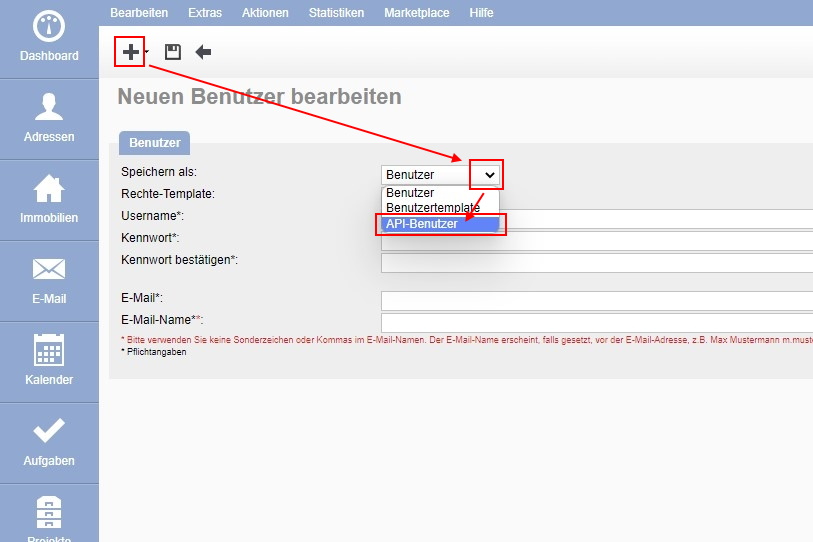
> If the option "API User" is not available, but only "User" and "User Template", this means that the API module is not activated for your onOffice version or that no API user quota is available. Contact onOffice Support or Sales to have this activated for you.
-
Give the API user a username, e.g. "propform.io".
-
Save the user by clicking on the "floppy disk" icon in the top-left corner.
2. API user rights
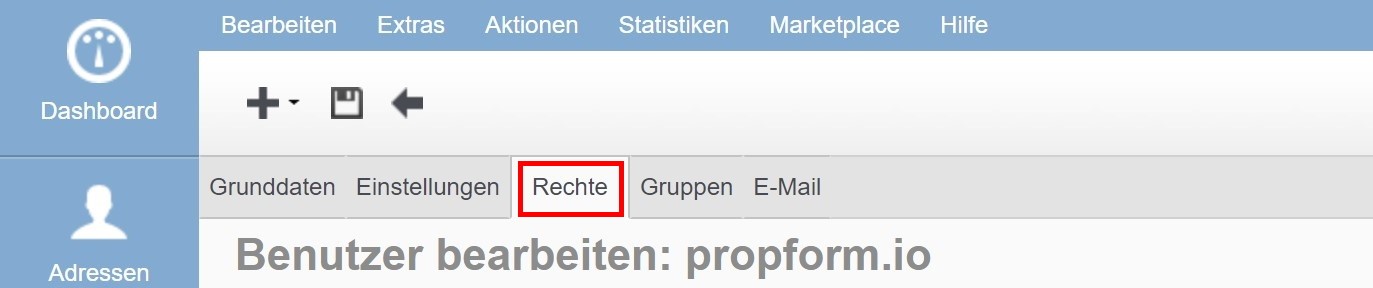
You can define the rights in the "Edit user" menu for the API user, on the "Rights" tab.
Below, we provide a recommendation for the permissions the API user should have. However, you can also restrict the permissions or customise them to suit your own usage requirements. Permissions other than those listed below can be disabled or restricted to "own only".
- Address management
- Estate
- Agent Log/Activities
- Word/Email Templates/Files
- Tasks
- Calendar
- Search Criteria
- Administrative Rights
- Project Management
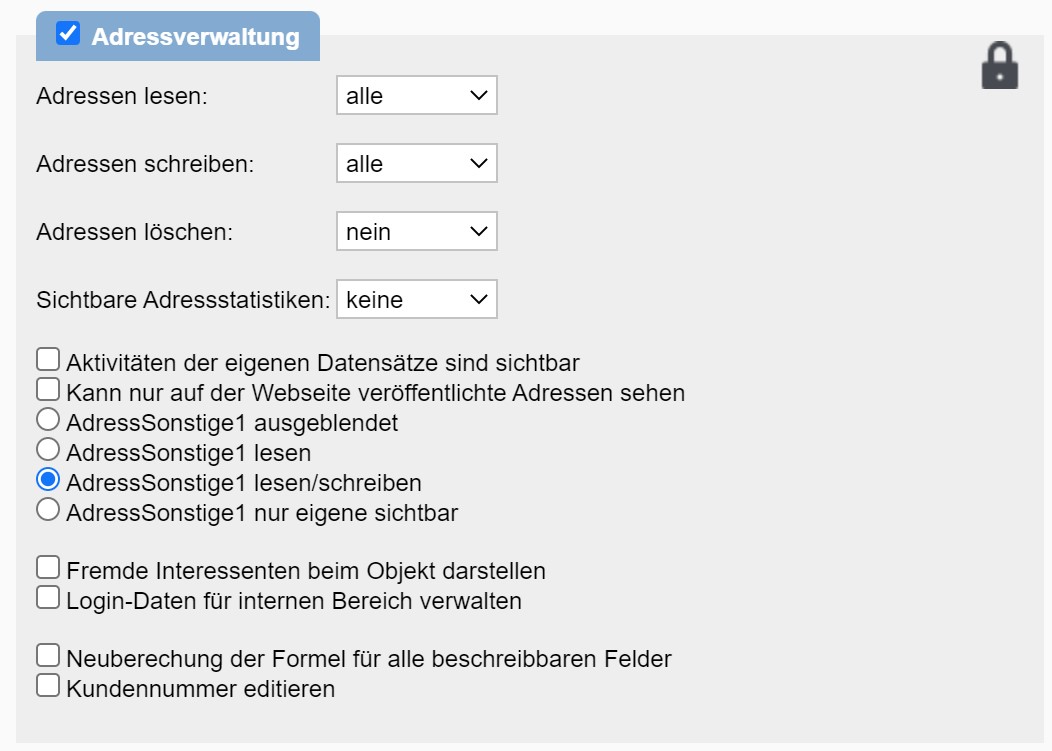
Address Management
- Addresses (tick box to the left of the category heading): enabled
- Read addresses: all
- Write addresses: all
- Read/write AddressOther1: enabled (optional, if you also want to edit fields on the AddressOther1 tab using forms):
- Edit customer number: enabled (optional, if you want to use forms to change the customer number of an address record. Who would do that, though...)
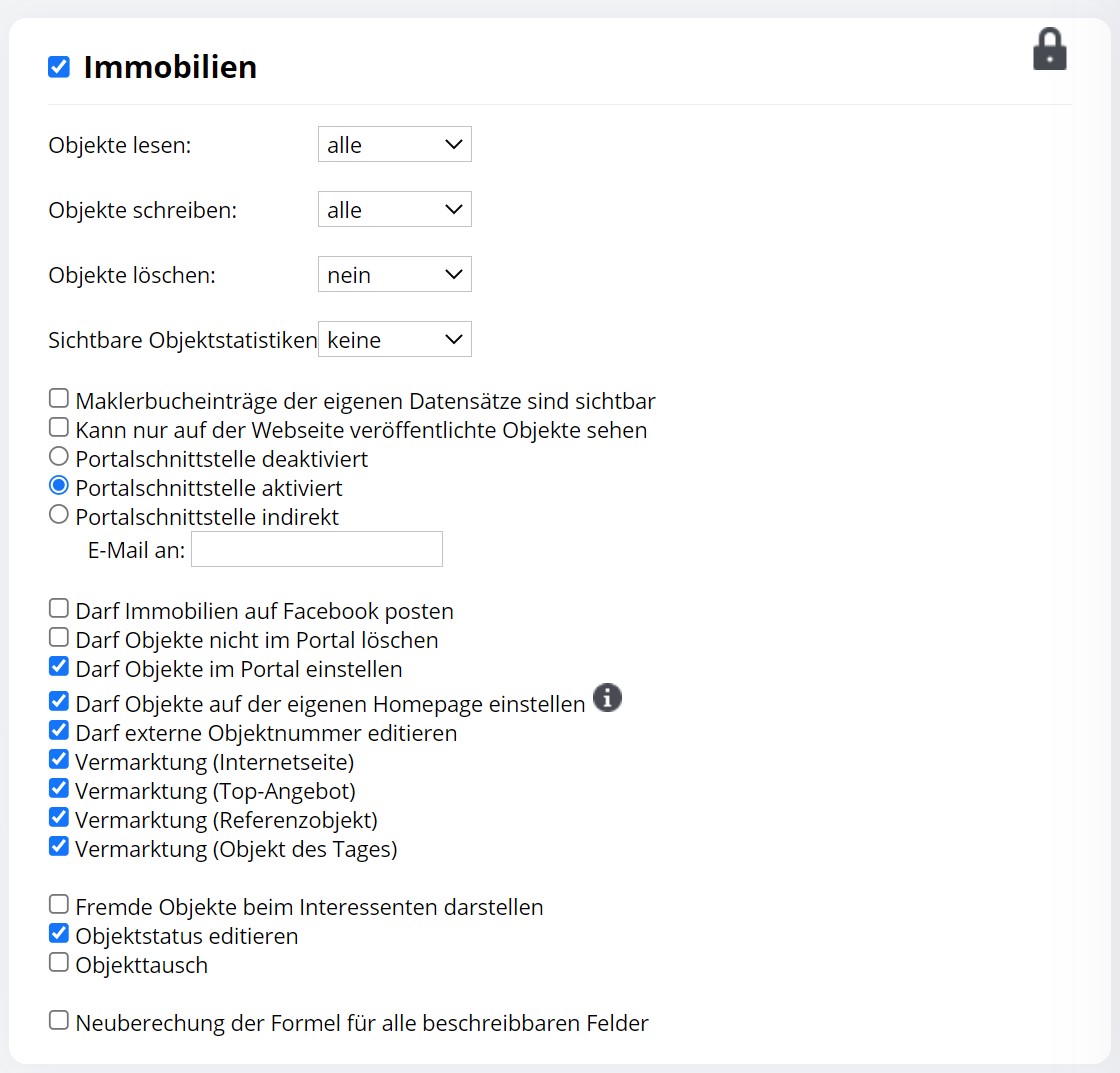
Property
- Property (tick box to the left of the category heading): enabled
- Read properties: all
- Write properties: all
> ⚠️ Important caveat: There is also the tick box “Can only read properties published on the website”. This option overrides the “all” permission selected above — even if “all” is set, the API user with this tick box active will only see the properties published on the website. Consequences: archived / internal / unpublished properties are invisible to propform; PDF property summaries are not generated automatically. Deactivate this tick box for propform use. More information under My form is not saving any data — Point 9.
- Allows properties to be listed on your own website: enabled (optional, if you have an onOffice website and wish to list properties on your own website using forms)
- Allows external property numbers to be edited: enabled (optional, if you wish to be able to change the external property number using forms)
- Marketing (website): enabled (optional, if you have an onOffice website and wish to list properties on your own homepage using forms)
- Marketing (Top Listing): enabled (optional, if you have an onOffice website and wish to feature properties as Top Listings using forms)
- Marketing (Reference property): enabled (optional, if you have an onOffice website and wish to display properties as reference properties using forms)
- Edit property status: enabled (optional, if you wish to be able to change the property status using forms)
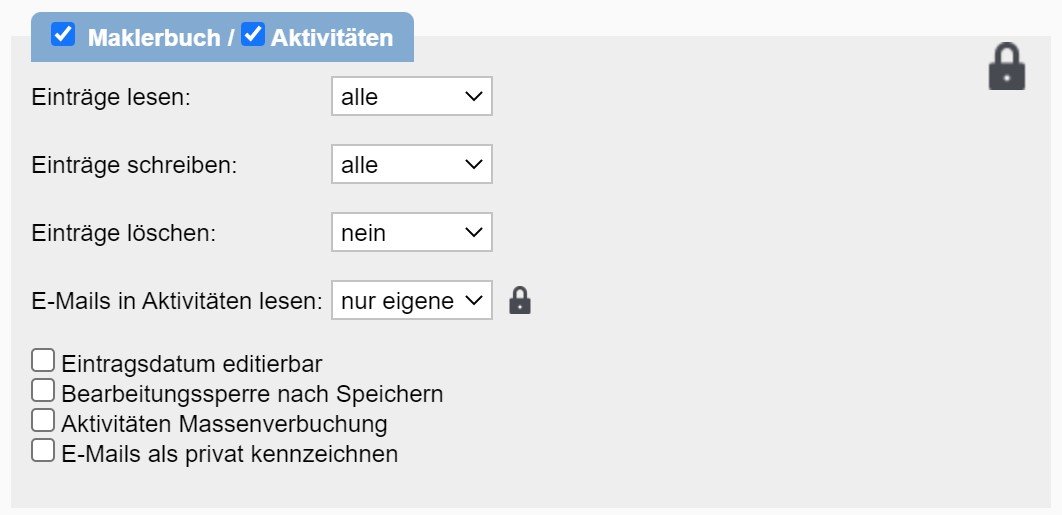
Agent’s Log/Activities
- Agent’s Log (tick box to the left of the category heading): enabled
- Activities (tick box to the left of the category heading): enabled
- Read entries: all
- Write entries: all
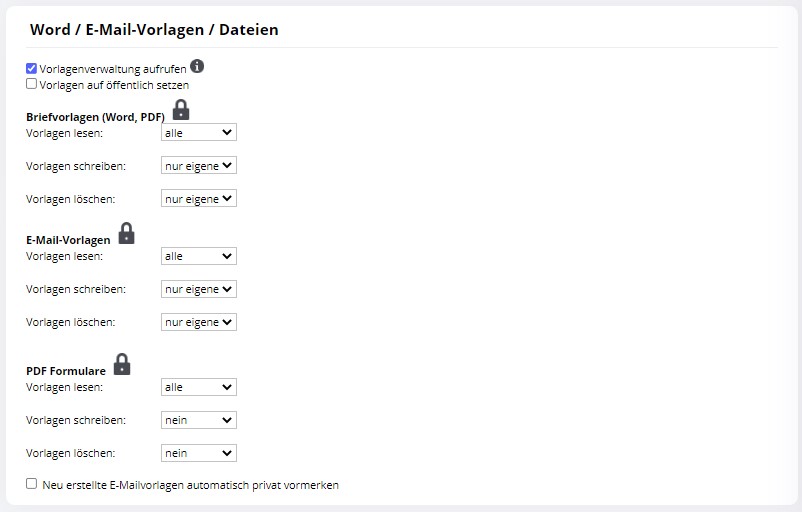
Word/Email Templates/Files
Letter templates (Word, PDF)
- Read templates: all
Email templates
- Read templates: all
PDF forms
- Read templates: all
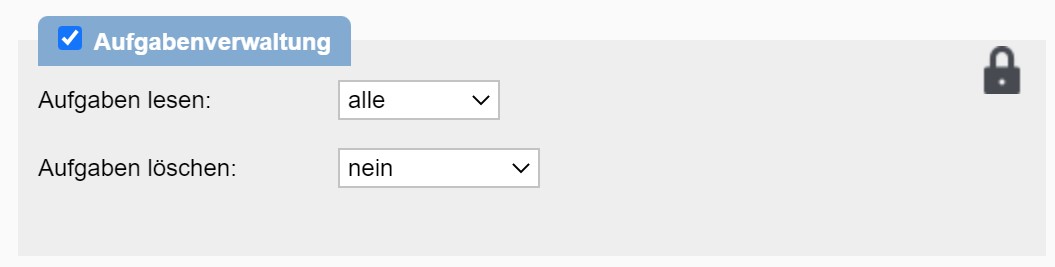
Tasks
- Task management (tick to the left of the category heading): enabled
- Read tasks: all
- Appointment management (tick to the left of the category heading): enabled
- Read appointments: all (optional, if you want to load an existing appointment into a form using an appointment ID)
- Edit appointments: all (optional, if you want to modify an existing appointment using a form via an appointment ID)
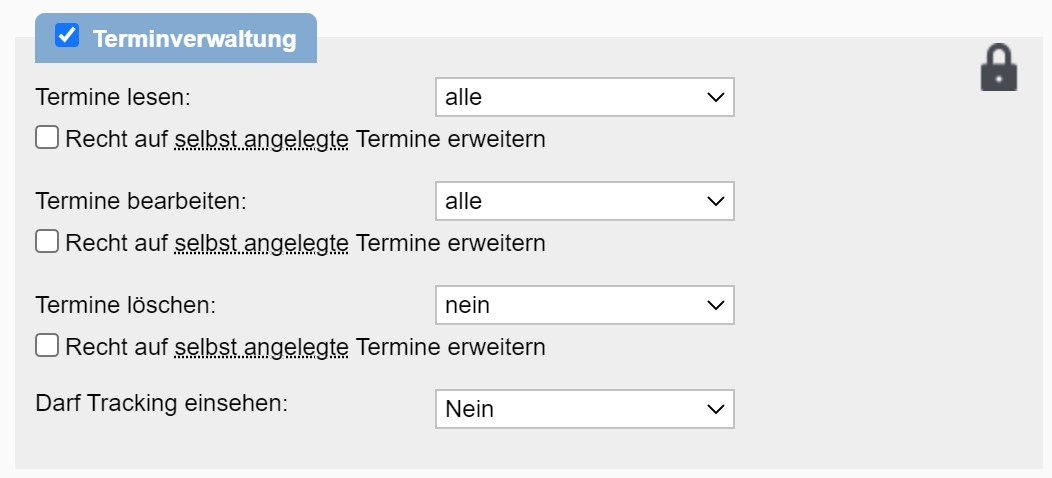
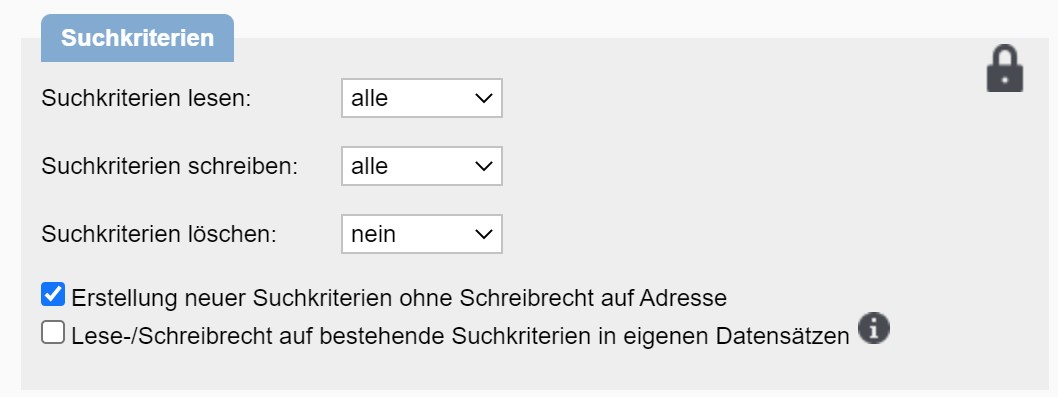
Search criteria
- Read search criteria: all (optional, if you want to load an existing search criterion into a form using a search criterion ID)
- Write search criteria: all (optional, if you want to create search criteria using a form or modify existing search criteria using a search criterion ID)
- Creation of new search criteria without write access to addresses: enabled (optional, if you have restricted write access for the API user in addresses)
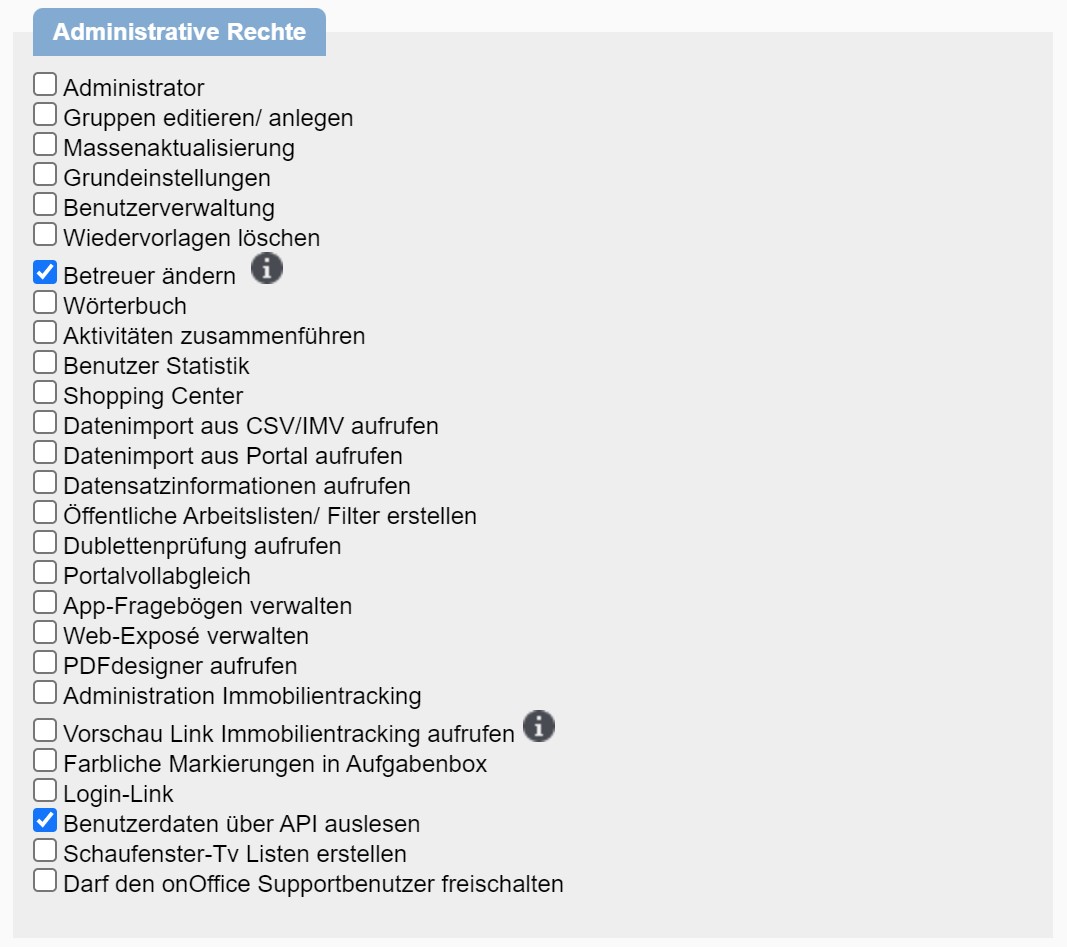
Administrative rights
- Read user data via API: enabled (Mandatory for propform — without this right, dropdowns with user selection will not work, meaning neither will the manager/responsible person fields in forms, activities and tasks. Often overlooked because the permission is located in the ‘Administrative Rights’ tab and not within the modules.)
- Change supervisor: enabled (optional, if you wish to be able to change the supervisor of property or address records using a form.)
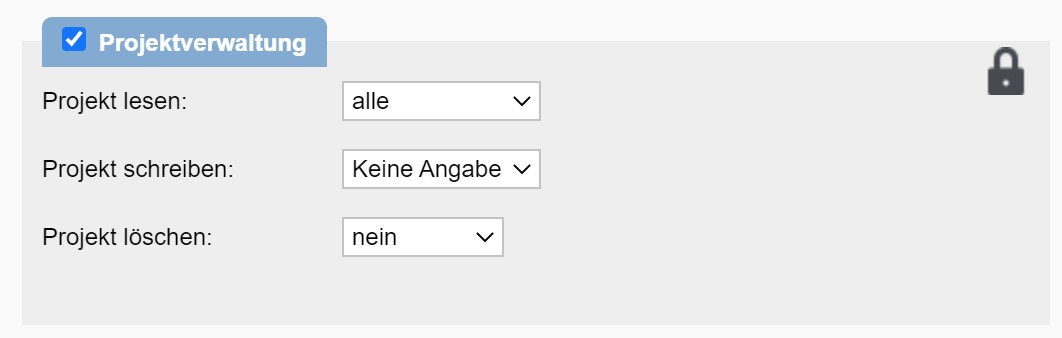
Project Management
- Project Management (tick box to the left of the category heading): enabled
- Read projects: all (optional, if you want to link tasks, properties or addresses to a project using a form.)
- Write projects: all (optional; currently, it is not yet possible to create or modify projects via the API, only to read them and link them to other records. If this changes, this permission could become useful.)
3. Save API token & secret on propform.io
- Open your propform.io settings.
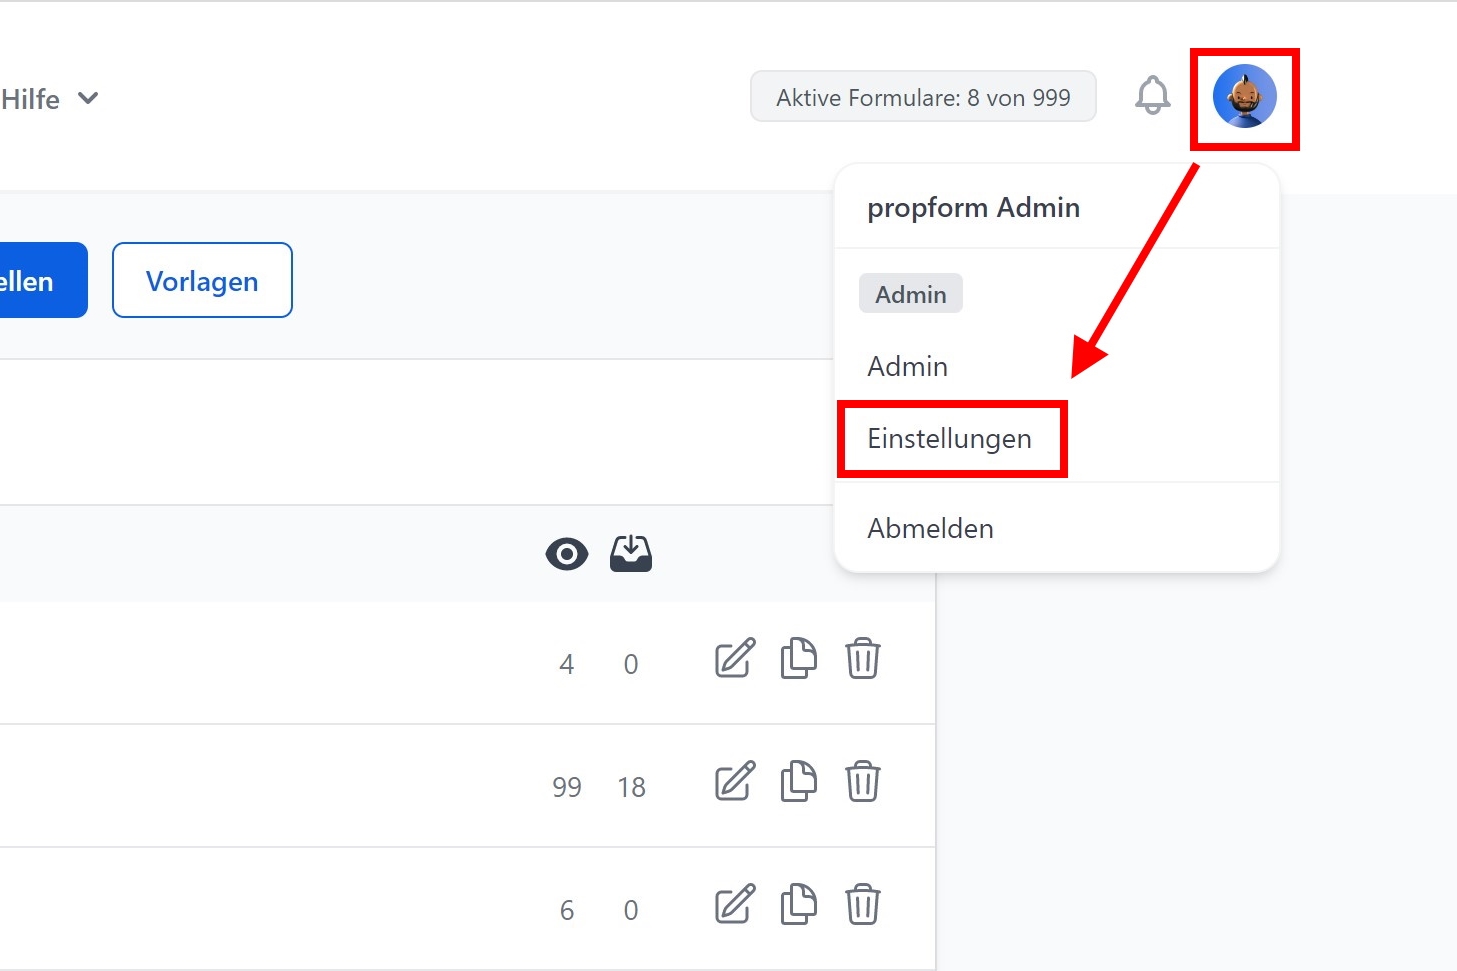
-
Go to the "onOffice API" section.
-
Enter the API token and secret from your onOffice API user.
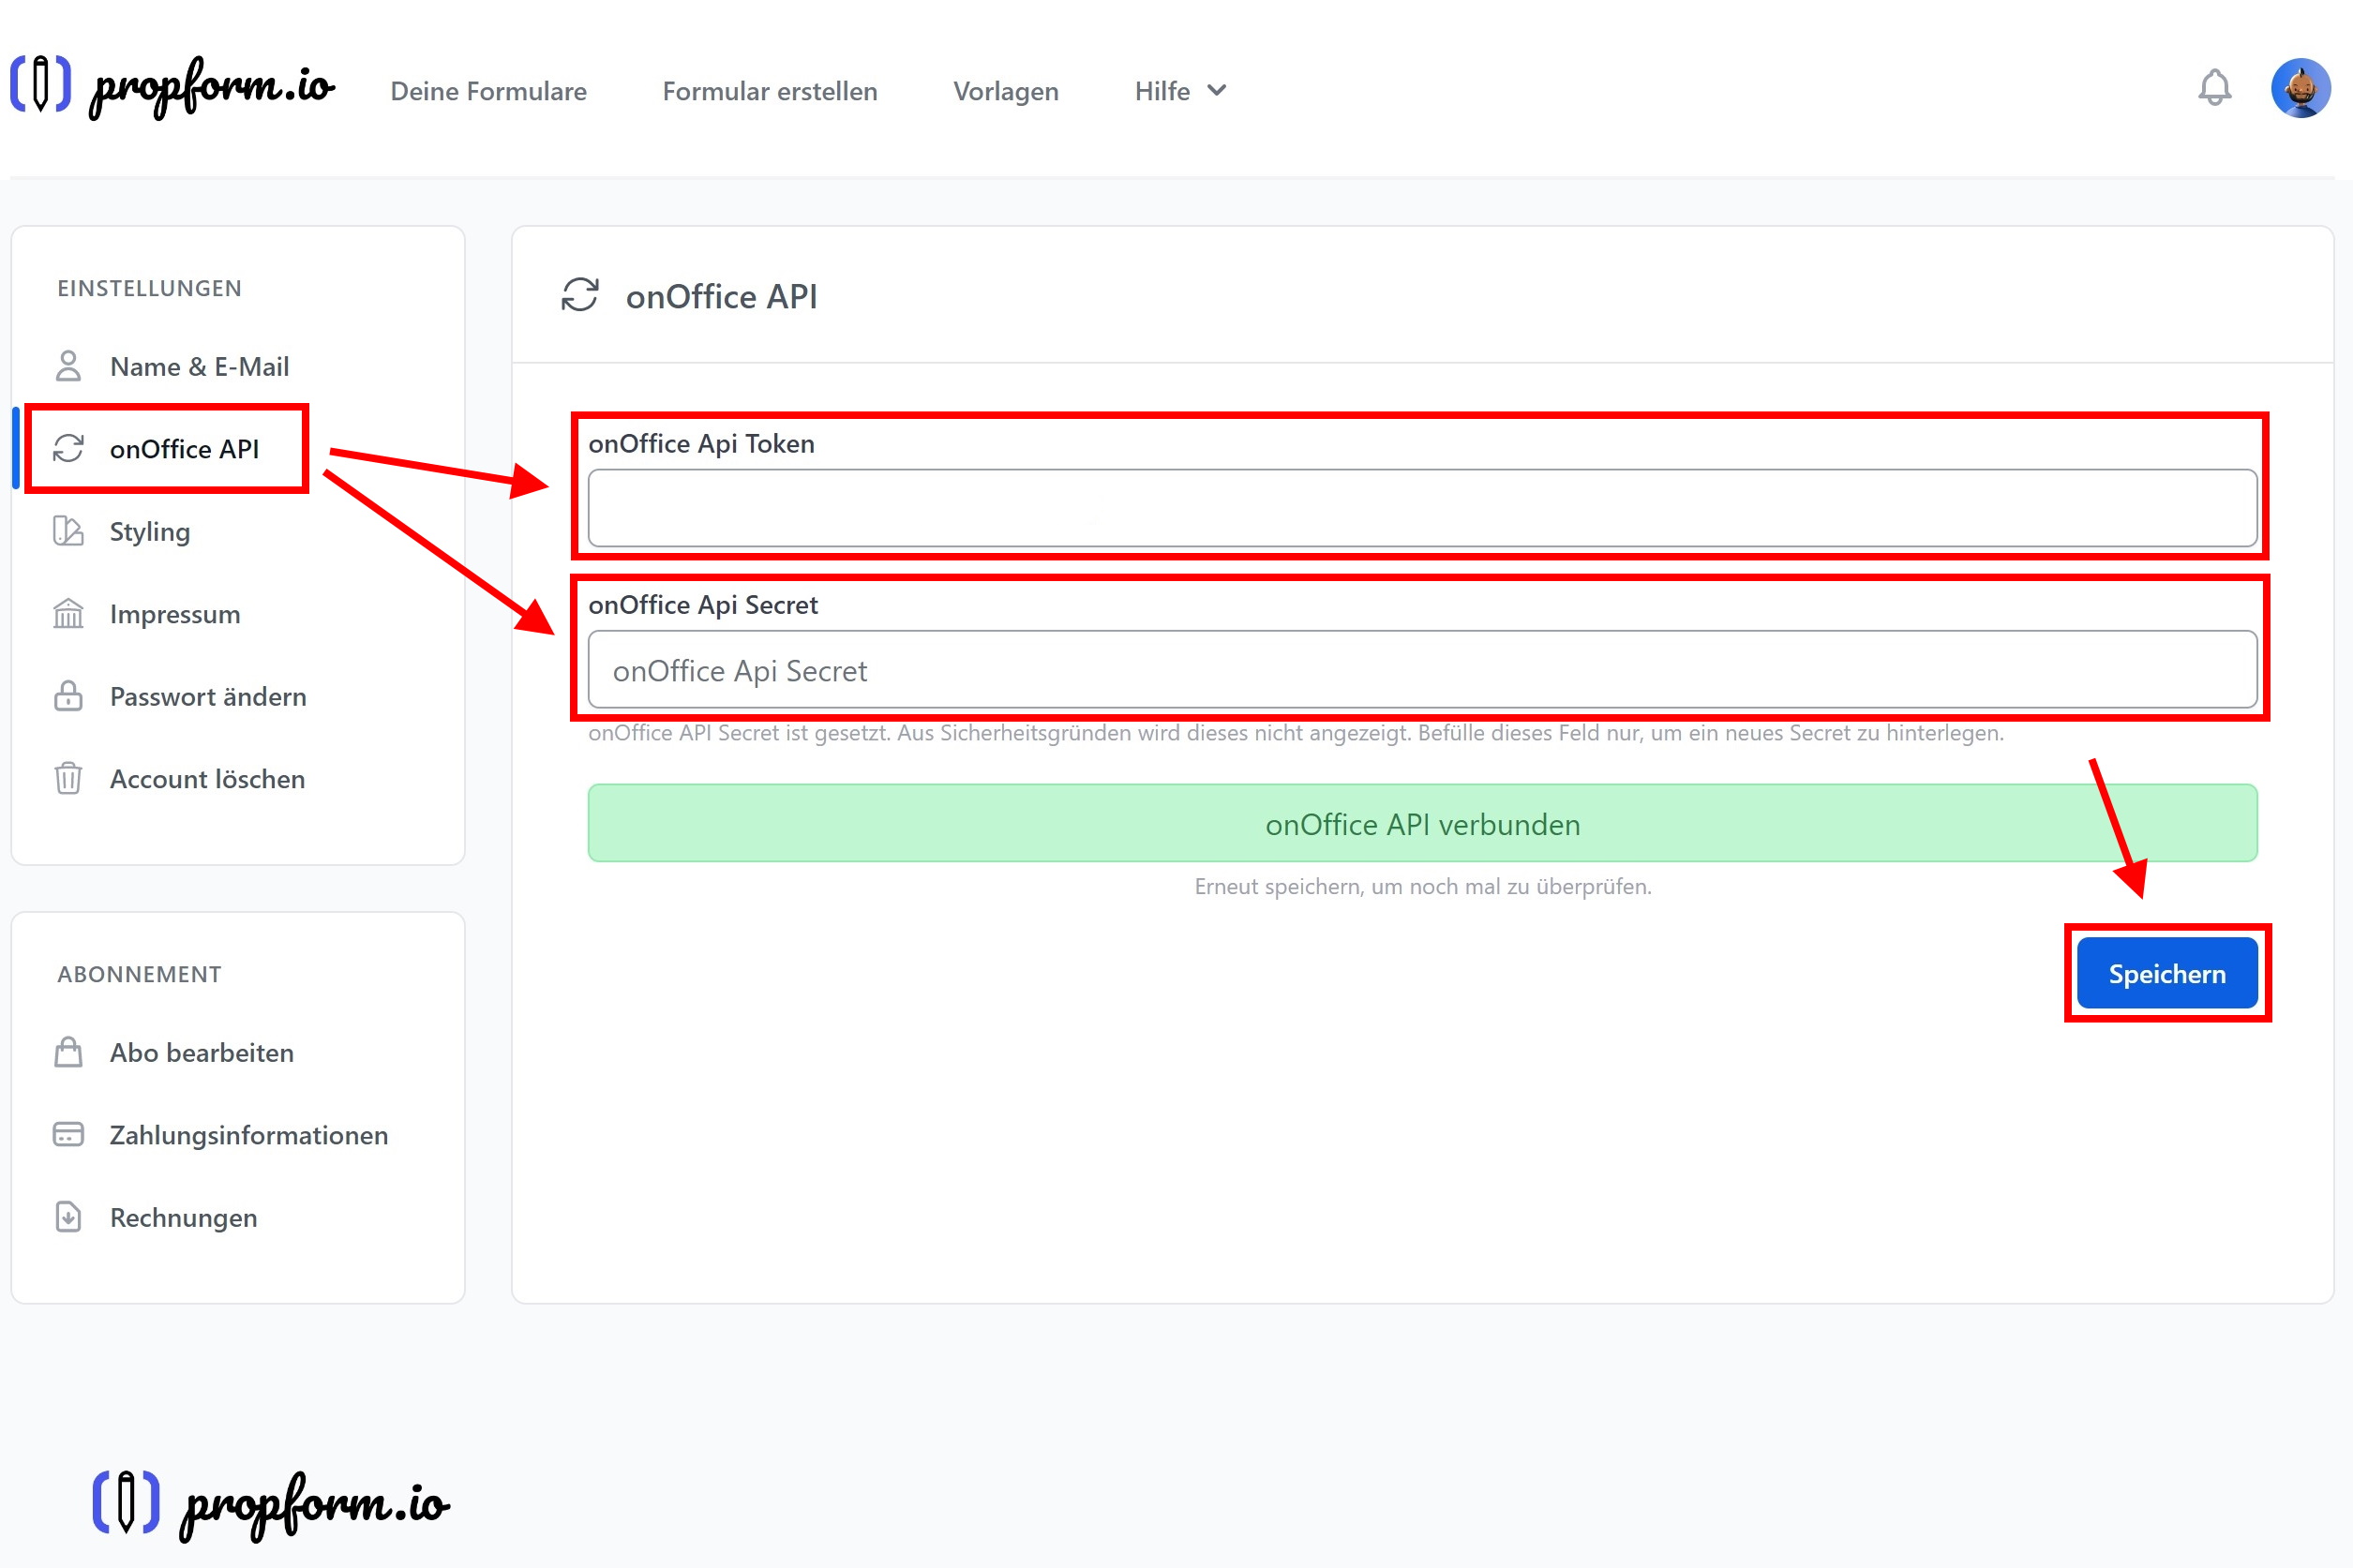
- Click on "Save".
> This completes the connection between propform.io and onOffice. In the final step, you need to assign an email inbox to the API user so that propform can send emails via the onOffice API.
4. Assign an API user to an email inbox + save the email address in propform
In order for propform to send emails via the onOffice API (e.g. replies to enquirers, internal info emails to team leaders), the API user must have access to an email account in onOffice — and the corresponding email address must be stored in your propform account.
4.1 In onOffice: Assigning an API user to a mailbox
-
In the onOffice menu bar, click on "Tools" → "Settings" → "Basic settings".
-
Switch to the "Email" tab. In the lower section, you will see a list of your email mailboxes.
-
Select the mailbox from which propform should send emails (or create a new one), and click the "+" icon to add a user to the mailbox.
-
Enter the name of your API user (e.g. "propform.io") and confirm. The API user now has access to the mailbox.
-
Copy the email address of the mailbox to the clipboard.
> 💡 If your API user needs access to multiple email inboxes (e.g. info@ and sales@), repeat steps 3–4 for each additional inbox.
4.2 In propform: Entering an email address
-
Open your propform.io account settings.
-
Go to the "onOffice API" section.
-
Enter the copied address in the "Email address(es)" field. Separate multiple addresses with commas.
-
Click "Save" and then "Send test email". propform will then send a test email from the configured mailbox to the same mailbox — if it arrives, everything is configured correctly.
> ✅ Done! propform.io is now fully connected to your onOffice and can also send emails via the onOffice API. You can find out how to configure emails for each form in Email in propform. > > If something isn’t working, check your API user’s permissions again — most problems are caused by missing permissions.