Fields
Fields are the building blocks of your form. They can read data (from a loaded onOffice record), display data (entered by the form user), and write data (to a new or existing onOffice record) when the form is submitted.
This page provides an overview of all available field types and their options. In the Quick Start video “Edit Form & Fields”, you can see the most important features in 5 minutes.
Contents
- Add field
- Field types overview
- Field settings — Labels & notes
- Field settings — Behaviour in the form
- Field settings — Pre-filling & values
- Number fields & range sliders
- Single & multi-select fields
- File upload fields
- File download fields
- Search criteria fields & regional add-ons
- Special types — Heading, Description, Image, Video, iFrame, Accordion, Divider, Line break, Link button, ChatGPT
- Record Link Field
Once you have saved a form, you will find the list of fields under the form settings. Click “Add Field” to create a new field.
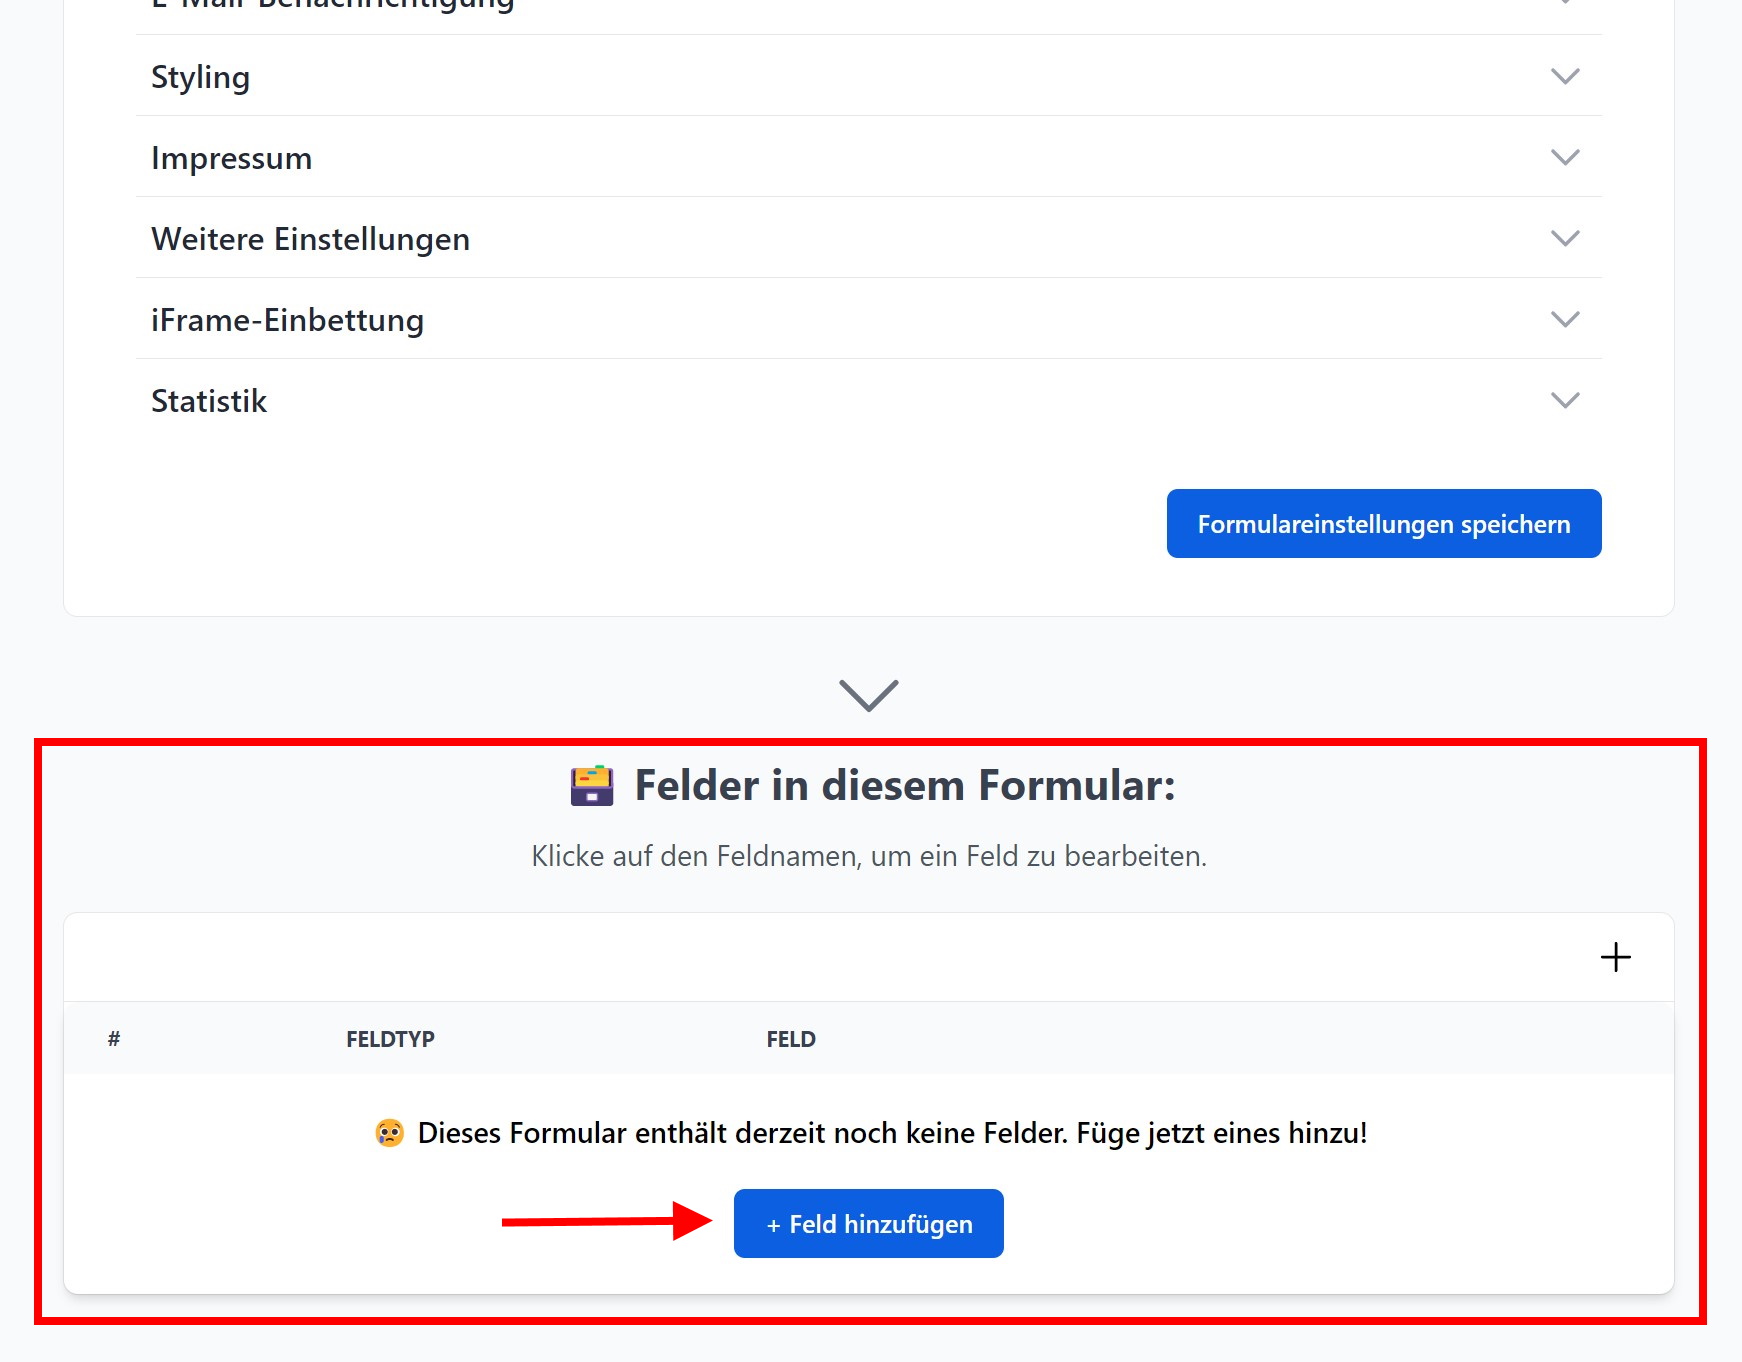
You can arrange fields in the desired order using drag and drop. Clicking the pencil icon opens the field settings.
> 💡 Fields can be added multiple times. If you have two identical fields (same field type + field name) in the form, only the last one will be used when the form is submitted.
Field types overview
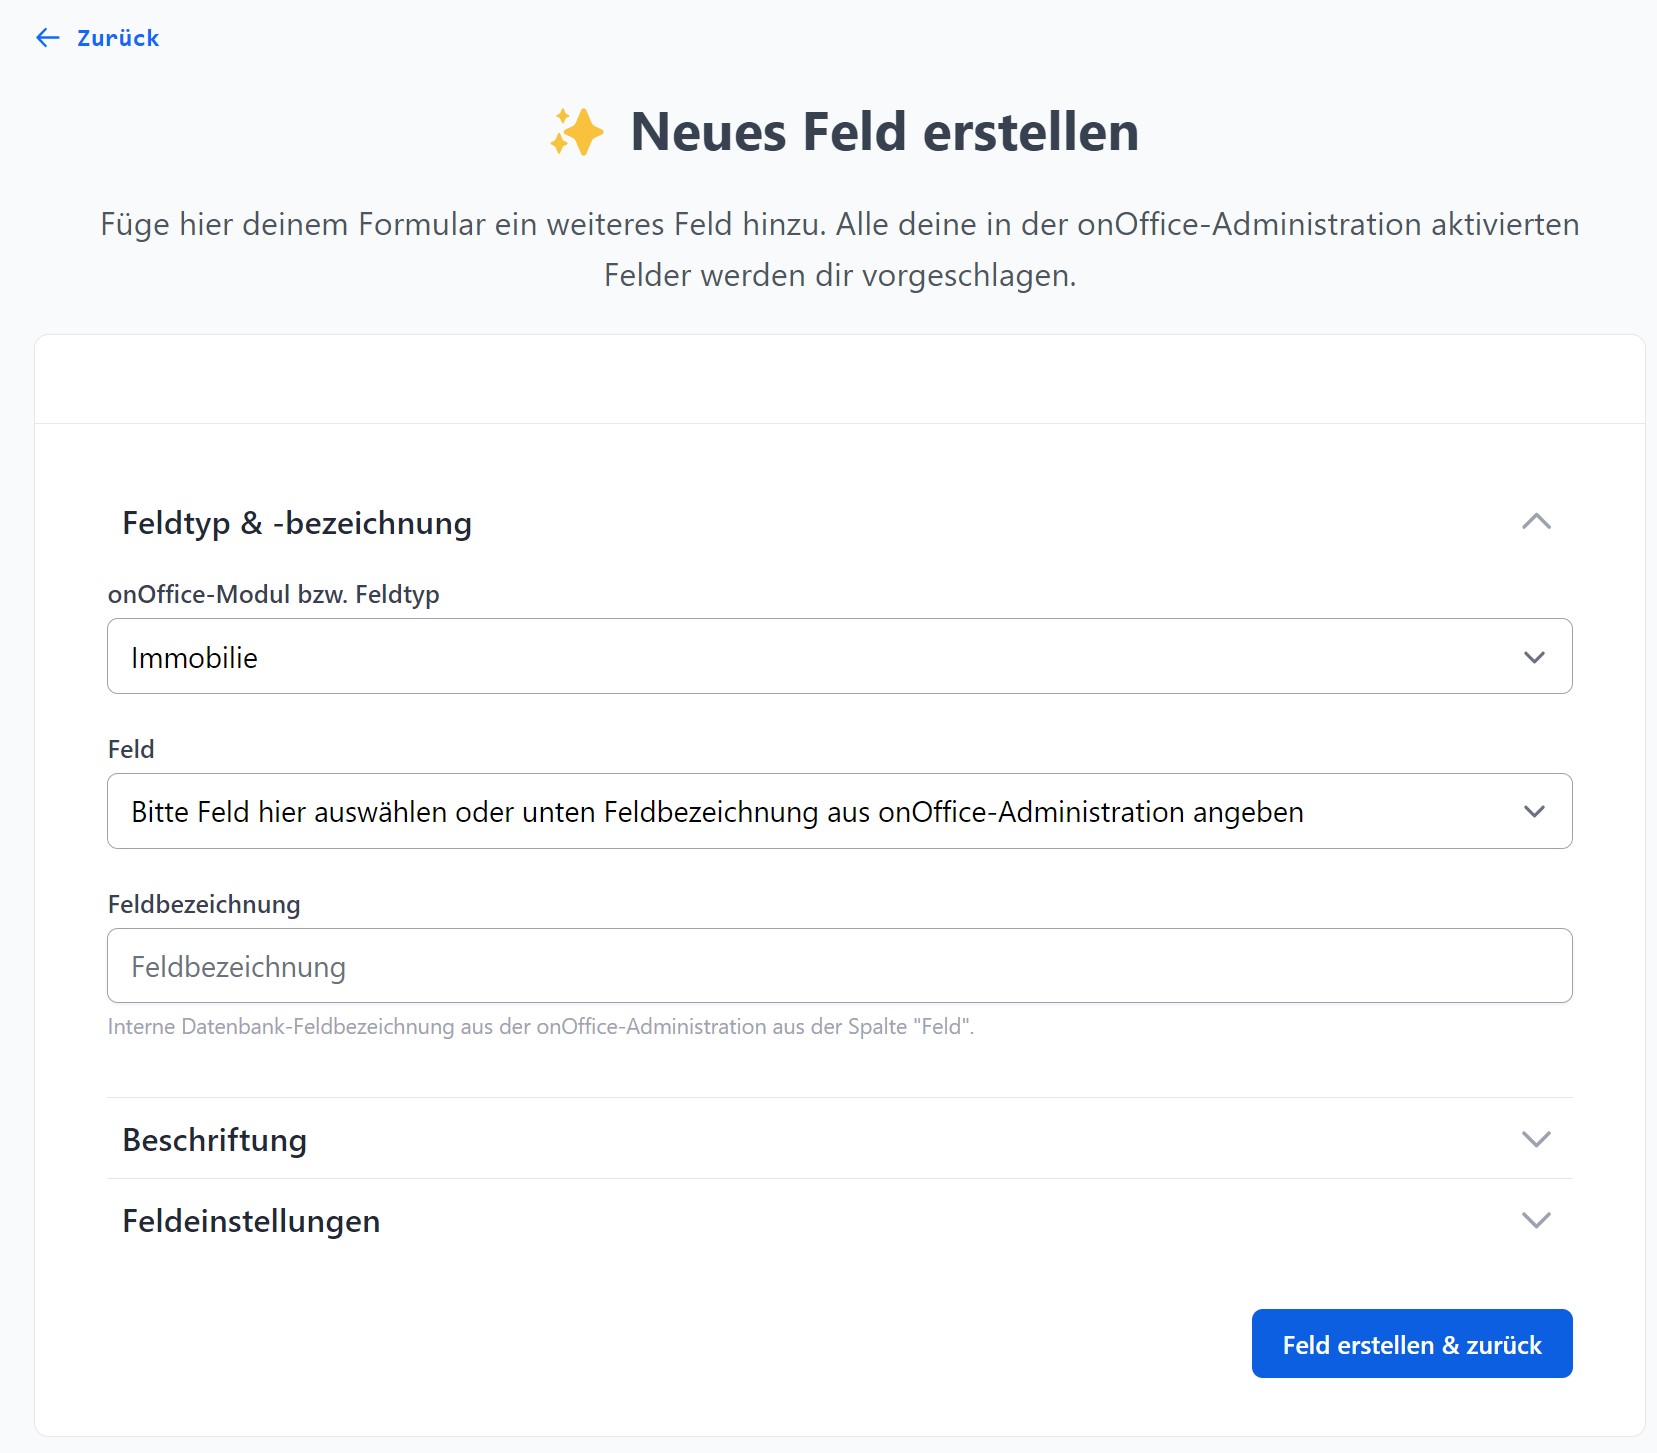
When creating a field, you first select the field type. This selection determines what the field does and which additional options are available.
onOffice modules
| Field type | Module name | Example fields |
|---|---|---|
| Property | estate |
Property type, purchase price, floor area, town, street |
| Address | address |
First name, surname, email, telephone, street |
| Activity / Agent’s Log | agentsLog |
Action type, Action category, Comment |
| Task | task |
Subject, Description, Status, Responsible person |
| Appointment | calendar |
Subject, Start/End, Status, Location |
| Search Criteria | searchcriteria |
Living space from/to, Property type, Region |
| Project | project |
Project name, Status |
> The individual fields available in each module come directly from your onOffice administration. If a field is missing, check in onOffice under Tools → Settings → Administration to see if the field is enabled there.
Special types (not onOffice modules)
| Field type | Purpose |
|---|---|
| Heading | Large text as a section heading |
| Description | Longer text with explanations, macro-resolved |
| Break | Separates multi-step forms into steps |
| Separator | Visual line for structuring |
| Link button | Stylish button linking to an external URL |
| Image | Embedded image (URL) |
| Video | Embedded YouTube or Vimeo video |
| iFrame | Embed an external page or another propform form |
| Accordion | Expandable section containing any content |
| ChatGPT | AI text generator field |
| Upload file | Multi-file upload field (see below) |
| Download file | Download link for files from the dataset (see below) |
| Dataset connection | Controls the relationship between address & property |
Field settings — Labels & notes
On the “Labels” tab, you define how the field is labelled in the form:
- Label: What appears as a label above or next to the field. If left blank, the field name is taken from the onOffice administration. Macros enabled — e.g. “Hello
_Vorname, what are you looking for?”. - Note: Short help text below the field. Macros enabled.
- Placeholder: Grey placeholder text in the field; disappears when typing. Macros enabled.
- Tooltip: Appears when hovering over the field (small “?” icon). Macros enabled.
- Datalist: Suggested values (separated by
;) that the browser displays as autocomplete suggestions whilst typing.
Field settings — Behaviour in the form
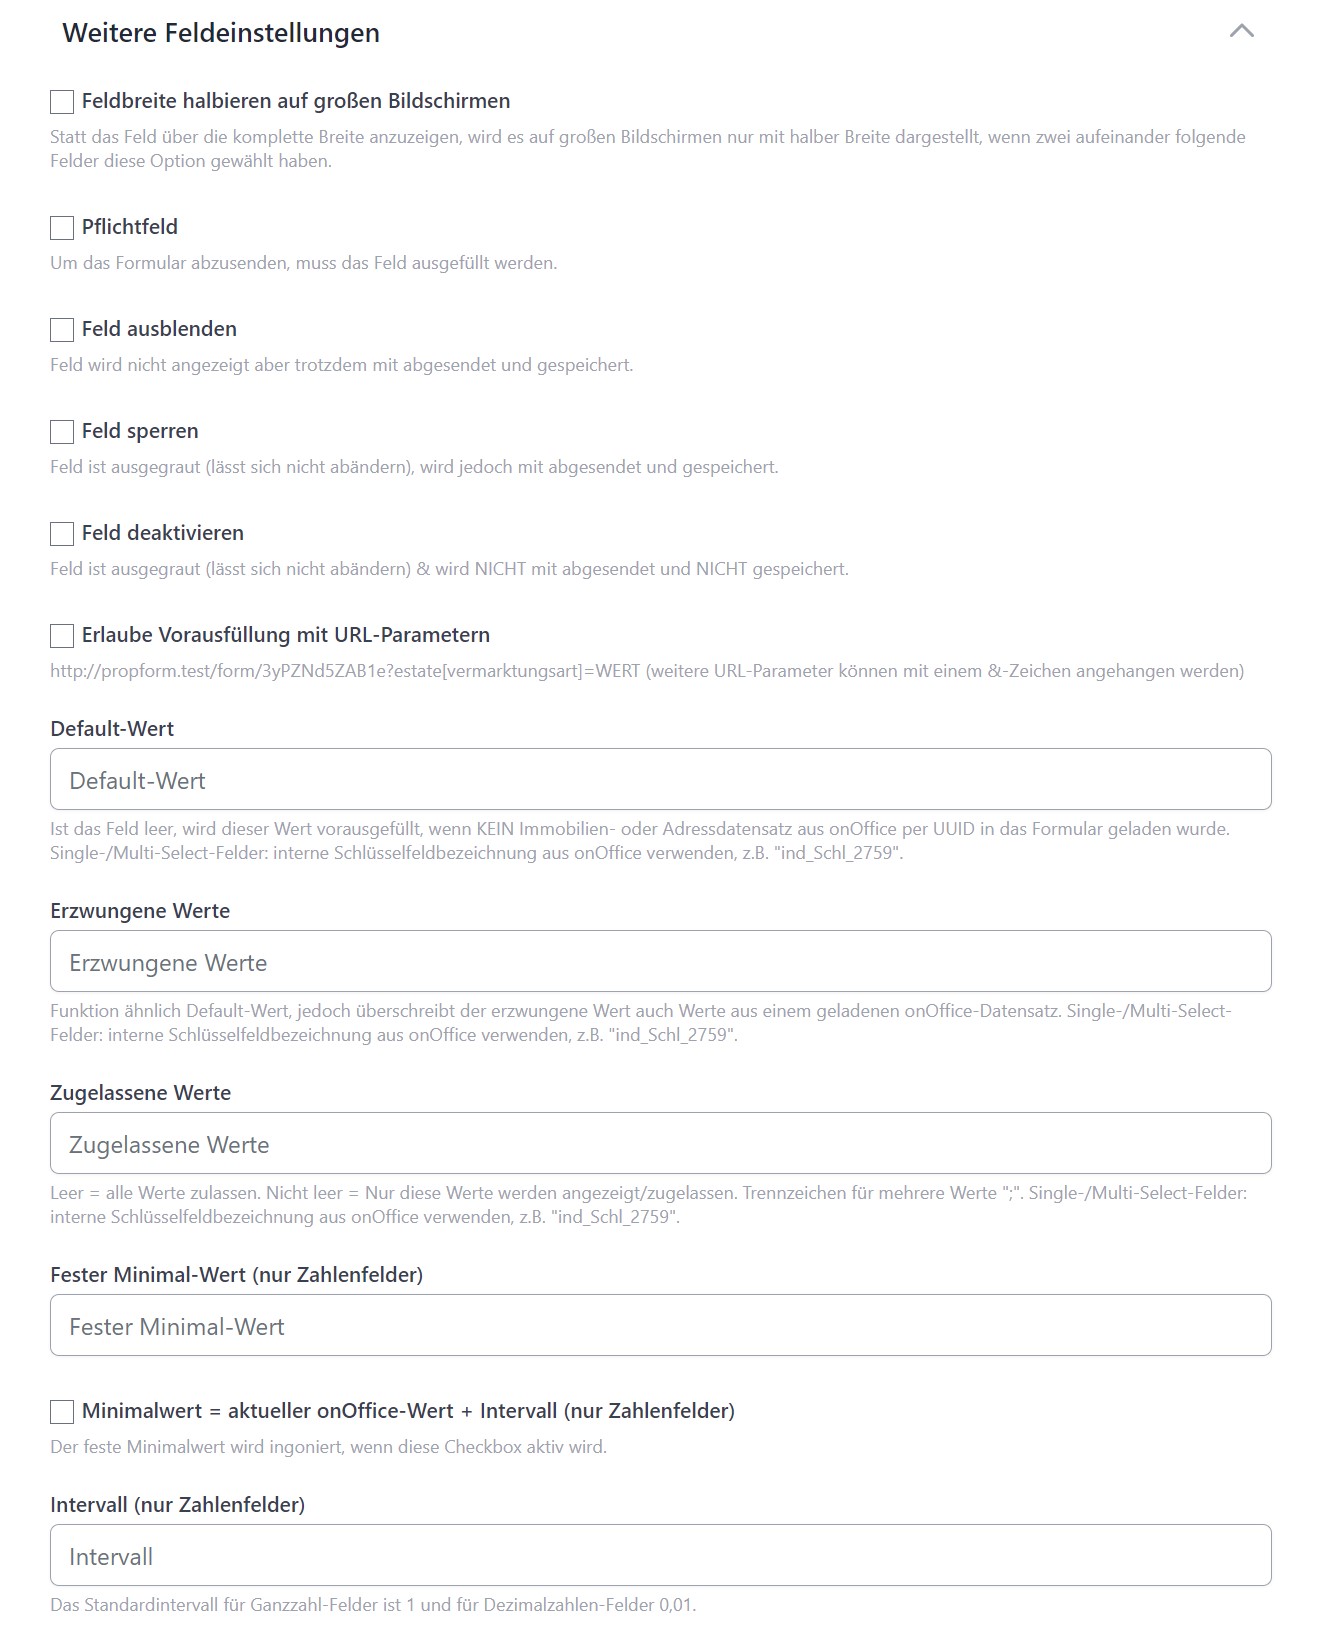
- Required field: The form can only be submitted if the field is filled in.
- Hide field: The field is invisible in the form, but is still submitted along with its content. Useful in combination with default or forced values.
- Lock field (read-only): Content cannot be changed by the visitor; the field is greyed out. It is still submitted.
- Disable field: Same as locking, but it is not submitted — the value is lost.
- Halve field width: On large screens, the field is displayed at half its normal width — if two consecutive fields both have this option, they appear side by side.
- Browser autocomplete: Enable for fields such as Name/Email/Phone so that the browser suggests values from its cache.
Field settings — Pre-filling & values
What pre-fillvalues does a field have? There are four sources, in this order of priority from weakest to strongest:
> Default-Wert ← overridden by ← Wert aus onOffice-Datensatz ← overridden by ← URL-Parameter ← overridden by ← Erzwungener Wert
- Default value: Displayed when the form is called up empty.
- Allow pre-filling with URL parameters (default: on): Enables the field to be pre-filled via
?modul[feldname]=wert. - Required values: Overrides everything. Furthermore, submission is only possible if the value matches the required value exactly. Separate multiple values with
;. - Allowed values: A list of permitted values (separated by
;). The form can only be submitted if the field value matches one of these. For single/multi-select, only these options are displayed.
> 🔑 Important for single/multi-select: You must use the internal key names from the onOffice administration — e.g. ind_Schl_2759, not the displayed plain text.
More details: Pre-filling & loading records.
Numeric fields & range sliders
For numeric fields (purchase price, floor area, number of rooms, etc.), there are additional options:
- Fixed minimum value: Lower limit that the visitor cannot go below.
- Fixed maximum value: Upper limit.
- Interval: Increment — e.g.
1000for increments of 1,000 for the purchase price,0,0001for 4 decimal places. - Minimum value = current onOffice value + increment: Useful for bidding processes — the minimum value is calculated dynamically from the current value in onOffice plus the increment.
- Display unit/currency in field: Freely definable suffix such as
m²,€,kgetc. - Show counter buttons (+/−): Displays two buttons next to the field that increase or decrease the value with a click — ideal for on-site entry, e.g. the number of rooms while walking through the property. Any minimum/maximum value you set is respected.
- Counter button step size: How much one click on + or − changes the value (default
1). Deliberately independent of the field's interval: this lets a decimal field (e.g. rooms) still be counted in steps of 1 via the buttons while remaining a decimal field (so3.5is still possible). - Range slider: A slider is displayed instead of an input field — with its own minimum and maximum values.
> 💡 On a smartphone, the numeric keypad is automatically displayed instead of the letter keyboard. Thousand separators (full stops) are inserted automatically.
Single & Multi-select fields
There are several special options for drop-down lists (property type, contact type, marketing type, etc.):
Custom Labels
Instead of the original onOffice labels, you can assign your own labels to the options — e.g. “Yes”/“No” instead of ja/nein, or English translations. You specify the mappings in the field settings for each key.
> 💡 Use case: multilingualism: If you maintain an English/Spanish copy of a form, you can override the key labels for each option here (apartment → Apartamento, villa → Townhouse) — without touching the onOffice administration. More under Multilingual forms.
Restrict allowed values
Don’t want every option to be visible in the form? In Field settings → Further field settings → “Allowed values”, you can define a whitelist — all other options will be hidden.
Format: Key values separated by semicolons — e.g. ind_3673;ind_3675.
Finding key values: Right-click in the form → Inspect → Expand <select> → the <option> tags show data-selectable-data-value (key) + plain text (label).
> 💡 Special case: user fields: For single-select user fields (e.g. “Property manager”), the keys are internal user IDs such as 23, 45. You can only find these using the DevTools Inspect trick — onOffice does not display them in the administration panel.
Single select with search function
For fields with many options (e.g. user fields), you can enable a search box to appear when the field is clicked, allowing the visitor to type in values.
Multi-select modes
- Normal: Default. Opens a dropdown on click, showing the hierarchy of options.
- Alternative: Special mode for fields with a large tree structure (e.g. ‘Regional suffix’). Child values are not directly visible in the form — but are automatically activated upon saving if the parent element is selected.
- Legacy: Old behaviour, all options on a single level.
Append multi-select values instead of overwriting them
By default, a multi-select submit overwrites the existing value in onOffice completely — all existing tags are replaced. This is often undesirable for existing addresses (address duplicate check, see Merge multiple records): a customer who already has “Contact type=Buyer” and fills in a newsletter form should not suddenly only have “Contact type=Newsletter”.
Solution: In the form settings → “Write values” section, enable the option “Add / remove multi-select values”.
- Add: New values are added to the existing tags (rather than replacing them)
- Remove: Values are specifically removed from the tag list (e.g. newsletter unsubscription)
- Default (overwrite): Still applies to newly created addresses
> 💡 Difference to Hidden Field Default: A hidden field with a default value only applies to NEWLY created records. The Add/Remove setting also applies to existing records via the duplicate check — exactly what you need for newsletter/tag workflows.
Dropdown behaviour
- Open only when typing: The dropdown does not appear on click, but only when the visitor starts typing.
- Close after selection: The dropdown closes after a selection is made. If disabled, it remains open for multiple selections.
Hierarchy
Multiselect fields now display the hierarchy of options (parent/child). If you select a parent element, child elements are automatically ticked — and vice versa.
Auto-complete between fields
Fields can automatically complement one another — e.g. a first name field that generates suggestions based on title and surname, or a search profile description field that is automatically compiled from several fields.
Setup: Field settings → Label → Multi-select “Auto-complete” → select other field names from the form. When the source fields are changed, the tag is automatically populated with their values.
📖 More under Calculated fields.
⚠️ Anti-pattern: Duplicate fields in the form
If you add the same field twice in the form (e.g. title at the top and bottom), the later field always takes precedence on submission — even if it is empty. This overwrites the top field with nothing → data loss.
Instead:
- If you want to enter a second person (e.g. spouse): Use the onOffice standard fields
Anrede2,Vorname2,Name2,Strasse2etc. (often to be enabled in onOffice Administration under “Master Data 2”) - Or create three custom fields of your own (
anrede_2,vorname_2,name_2)
> 💡 Master Data 2 fields are disabled by default in many onOffice versions — before using them in the propform form in onOffice, go to Tools → Settings → Administration → Activate Addresses.
File upload fields
Select “Upload file” as the field type in an onOffice module (Address or Property). The visitor can upload one or more files, which go directly to the onOffice record.
Basic settings
- Document attribute (Property only): Select from your onOffice administration which document attribute the files should be assigned to.
- Extend the existing file of this document attribute (property only, appears once an attribute is selected): If the attribute of the property is already occupied by a file, the new file is appended to the existing one (PDF/image files into one PDF, other file types into a ZIP) and the merged file receives the attribute. Without this option, the attribute is transferred to the new file as before; the old file remains in the “Files” tab without the attribute.
- File type (Property only): Classification as
Foto,Aushang,Energieausweis,Grundrissetc. — is automatically mapped to the appropriate internal/external tab and the onOffice standard file type. Fallback default: “Internal document”. - File name upon saving: With macros — e.g.
_Name_VornameorGeldwaeschedoku_Name. For multiple uploads,_1,_2,_3are automatically appended. - File description & free text (property only, first file): Saved in the onOffice file mask as a description and free text.
- Internal/external tab (property only): Set to “external” by default (for publication), or optionally “internal” (visible to staff only).
- Apply watermark: Optionally overlay a watermark on the file — works only with JPEG files.
- Storage location: Position within the onOffice file tab.
> 💡 Address vs. Property: File upload fields in the Address module have fewer options (file name + free text) than in the Property module (all of the above). This is an onOffice API specification.
⚠️ Document attribute + multi-upload are incompatible
If a file upload field has a document attribute assigned to it, multi-upload is automatically restricted to one file — onOffice API rule: 1 attribute = 1 file.
Workarounds:
- Create multiple fields (e.g. “ID front” + “ID back”), each with its own attribute
- Enable ZIP/PDF bundling (see next section) — all uploaded files are combined into a single file that inherits the attribute
- Use a file field without a property — this allows any number of uploads, but without classification
Apple browser quirk: On iPhones, disabled single-select options are not hidden but are displayed greyed out (HTML standard). If you want to avoid this: use “Allowed values” (whitelist) instead of disabling individual options — the disallowed options will then be completely removed from the dropdown.
Combine multiple files
Very handy for lots of photos or multiple PDF pages:
- ZIP bundling: All uploaded files are combined into a single ZIP file. Optional “only for multiple files” — a single file is uploaded normally.
- PDF bundling: Multiple images or PDF files are merged into a single PDF.
- Rename files before bundling: The file names within the ZIP/PDF follow a template (macros enabled).
Restrict the allowed file types
By default, a file upload field accepts all common file types (images, PDF, Office documents, spreadsheets, e-mail files, archives, audio, video). In the file field settings, under "Allowed file types", you can specify exactly which file types the visitor may upload.
- Group quick-select: Tick Images, PDF, Office documents, Spreadsheets, E-mail files, Archives, Audio or Video — selecting or deselecting a group toggles all of its extensions at once.
- Individual fine-tuning: Under "Adjust individual file extensions" you can enable each extension separately (e.g. only
.jpgand.png). - Nothing selected = everything allowed: If you leave the selection empty, nothing changes compared to the previous behaviour — all supported file types are allowed.
The restriction works twice over: the browser's file dialog only offers the allowed types in the first place, and on submission it is additionally checked on the server. This way no unwanted file types end up in onOffice.
💡 Typical use case — images only for a later PDF: For notary instructions (and similar workflows), the uploaded files are assembled into a PDF in onOffice after the form is submitted — for example via an onOffice template using
_dateipfadObjektfeld. Only images can be embedded into such a PDF, not finished PDF files. So restrict the upload field to "Images" so that visitors can't upload PDFs in the first place, which would otherwise disrupt the later PDF creation.
⚠️ Interaction with PDF bundling ("Merge files into a PDF"): If PDF bundling is active on the same field (propform itself merges the uploads into a PDF), only images and PDF are technically possible — this fixed requirement then takes precedence, and your file-type selection is not additionally applied in that case. A corresponding note appears in the editor. For the notary case above this is irrelevant, because there it's onOffice (not propform) that creates the PDF and "Merge files into a PDF" is not active.
Files already stored: change, extend, download
If the upload field targets a file field of the onOffice mask (address or property), you define per field state what the visitor may do:
- If the field does not contain a file yet: allow upload (yes/no).
- If a file is already stored in the field:
- Change — the new file replaces the existing one.
- Extend — the new file is appended to the existing one: PDF and image files are merged into one PDF, other file types are bundled into a ZIP (an existing ZIP is extended).
- Both enabled — the visitor sees two buttons (“Change” / “Extend”) and decides for themselves.
- Both disabled — no upload is possible while a file is stored in the field.
- Allow download (in the download field settings): The visitor can download the stored file from the form — can be combined with change/extend (hybrid) or used as a pure download field.
Existing forms were automatically migrated to the new settings and behave unchanged.
⚠️ Limitation in the property module: Download and extend only work there for files that were previously uploaded via a propform form. In the address module, both always work — even if the file was stored directly in onOffice.
Write activity after file upload
In the file field settings you can enable the toggle "Write activity after file upload" per upload field (address and property modules). After every successful upload via this field, propform automatically writes an activity in onOffice — linked to the address and property loaded in the form.
- You choose action kind, action type and feature from your onOffice configuration as usual.
- One activity per field per submission: If the visitor uploads several files, the activity lists all of them — each with file name, file type, size and SHA-256 hash, plus the form URL and a timestamp. The entire information is additionally signed with an HMAC-SHA256, so it cannot be altered afterwards without detection.
- "Save uploaded files in activity": Optionally, the files are also attached directly to the activity.
- With active ZIP/PDF bundling or when extending, the activity documents the final, merged file.
💡 Especially valuable for signature fields: Together with the hash, the activity provides solid documentation of when which signature or self-disclosure was uploaded — analogous to the existing activity on file download.
Signature pad
In the file field settings, tick the “Signature field” box. Instead of the standard file picker, a digital pad is displayed in the form — the visitor signs using a mouse or finger.
- The signature is saved as a PNG in the onOffice file field (not PDF)
- Treated like an uploaded file (document properties, tabs, watermark options available)
- Using the macros
_dateipfadAdressfeldor_dateipfadObjektfeld, you can insert the signature into onOffice PDF templates — perfect for tenant self-declarations, emergency authorisations, powers of attorney, etc.
> 💡 Related option: Ticking “Prevent email attachments for files from this field” prevents the signature PNG from being attached to the notification email — useful if the signature already appears in the PDF property description and should not be sent twice.
📺 Watch video: 9. Add signature field to form
> 📎 HEIC images from the iPhone are automatically converted to JPEG. > 📎 File size limit: 128 MB per individual file (server-side nginx limit). For larger individual files, the user will receive a server error before the actual upload.
File download fields
With download fields, you can make files already stored in onOffice available for download to form visitors. Handy for digital data/download rooms.
📺 See video: 12. Downloading files
Selection criteria (which file is downloaded?)
You can choose from various selectors:
- By document attribute: Specific attribute exactly match
- Document attribute contains string: E.g. all files with “Expose” in the attribute
- Last file with file type X
- Latest file with name containing X
- Latest file with title containing X
- All files with file type X / name containing X / title containing X
- External URL (stored statically)
- Create PDF from onOffice template (Exposé / Letter / Form)
Further options
- Rename file on download: Macros enabled — e.g.
Expose_Name_Vorname.pdf - Hide field if no file: If the selector cannot find a matching file, the field is not displayed.
- Record activity on download: Who downloaded what and when → Activity log in onOffice.
Search criteria fields & regional add-on
Fields in the Search Criteria Module must be explicitly defined as search criteria fields in the onOffice administration; otherwise, they will not be offered by propform.
Range fields (from/to)
Fields such as ‘Living space’, ‘Purchase price’ and ‘Number of rooms’ have a From and a To value in search criteria. You can:
- Custom labels: Assign your own labels instead of “from” / “to” (e.g. “min.” / “max.”).
- Separate URL parameters: Using a double underscore —
?searchcriteria[wohnflaeche__von]=50&searchcriteria[wohnflaeche__bis]=80
Special case: Regional supplement
The “Regional Supplement” multi-select field often has a very extensive tree structure (postcode, districts, regions). In “Alternative” mode, the child elements are not displayed directly in the form, but are automatically activated when the parent element is selected. This keeps the form fast and clear.
Special types
Heading
Large text serving as a section heading. Macros enabled — e.g. “Enquiry regarding _objektart in _ort”.
Description
Longer explanatory text, usually between fields. Macros enabled. Within descriptions, you can use propform macros such as _pfButton(...) or _pfLink(...) to create buttons and links — see propform macros.
> 💡 You can also embed iFrames in description fields — e.g. a Timum appointment booking iFrame. Useful for integrating external functions directly into the form.
HTML in description fields
Description fields allow extensive HTML — filtered via HTMLPurifier (XSS-safe, but generously configured):
- Text formatting:
<strong>,<b>,<em>,<i>,<u>,<small>,<mark>,<sub>,<sup>,<s>,<ins>,<del>,<br>,<hr>,<p>,<h1>–<h6> - Lists:
<ul>,<ol>with<li> - Tables:
<table>,<thead>,<tbody>,<tr>,<th>,<td>(withborder,cellpadding,cellspacing,colspan,rowspan) - Links:
<a href="..." target="_blank|_self|_top" class="..." type="..."> - Images:
<img src="..." width height alt style> - Containers:
<div class style>,<span class style>,<blockquote>,<cite> - HTML5 structural elements:
<section>,<nav>,<article>,<aside>,<header>,<footer>,<address>,<figure>,<figcaption> - Video:
<video controls preload poster>with<source src type> - iFrames (HTTPS only, e.g. for Timum appointment booking, YouTube, etc.) —
<iframe src width height title allow allowfullscreen frameborder> - CSS
styleattributes: generously permitted (including!important, vendor prefixes, proprietary properties) — you can set colours, sizes, margins, borders, backgrounds, Flexbox/Grid, transformations, etc.
> 🔒 Security: <script> tags and event handlers (onclick=, onload= etc.) are blocked (XSS protection). iFrames are only permitted via HTTPS. This means you cannot inject arbitrary JavaScript code.
Macro resolution in description fields: fully active — you can use _calculate(IF(...)) for conditional content, dynamically embed fields from the dataset, or use _pfGetSearchCriteriaInformation for search profile tables.
Line break
Splits the form into multi-step steps. Per break field:
- GTM step name (for Google Tag Manager)
Separator line
Simple visual line. No content, for structure only.
Link button
Stylish button that links to an external URL. You can append currently loaded IDs/UUIDs to the URL — e.g. “Jump to the follow-up form with the newly created records”. Options:
- Append Estate ID/UUID (with type)
- Append address ID/UUID (with type + contact type)
- Append search criterion, activity, task, appointment or project ID
- Open in new tab
Image
Embedded image via external URL.
Video
Embedded YouTube or Vimeo video. For Vimeo, the privacy hash parameter can also be specified.
iFrame
Embeds an external website or another propform form directly into your form — ideal for seamlessly integrating, for example, the identity/credit check from It's My Data, a booking calendar, or another form.
- iFrame URL: The base address of the page to embed.
- URL parameters: Key/value pairs appended to the URL as
?key=value. Macros are allowed as values — e.g.firstName=_Vorname,email=_Email. These are filled with the data of the loaded onOffice record when the form opens. If you paste a complete URL including parameters into the URL field, the parameters are automatically moved into the list. - Quick selection: Ready-made templates for It's My Data (URL + default parameters) or another propform form (chosen from your form list).
- Height: Either a fixed height in pixels or automatic height adjustment. Automatic height only works with embedded propform forms — external pages such as It's My Data need a fixed height.
- Open thank-you page after submission in: If you embed another propform form, you decide whether its thank-you page appears in the iFrame, the current tab, or a new tab after submission.
💡 It's My Data: Choose the "It's My Data" quick selection and enter your customer number (
utm_ref) — first name, last name, and email are passed automatically from the loaded address record via macros.
ℹ️ For simple iFrames without parameters (e.g. a Timum booking calendar), you can alternatively use a Description field with iFrame HTML — but the dedicated iFrame field type is more convenient and supports macro parameters and automatic height.
Accordion (Collapsible Section)
Expandable section. Content consists of any other fields. Options:
- Heading (always visible)
- Status: Collapsed or expanded by default
ChatGPT field
Special field for AI text generation — the visitor enters data, ChatGPT generates the text and writes it into an onOffice field. This is configured in the form settings under “ChatGPT text generation”.
Record Link Field
If your form creates or edits both an address and a property at the same time, you need a link between the two — e.g. “Owner”, “Buyer”, “Tenant”, “Prospective buyer”.
In the form settings, you can select a static link. If you need a dynamic link (e.g. dependent on a selection field), add a record link field to the form. It doesn’t matter whether you select the field type “Property” or “Address”.
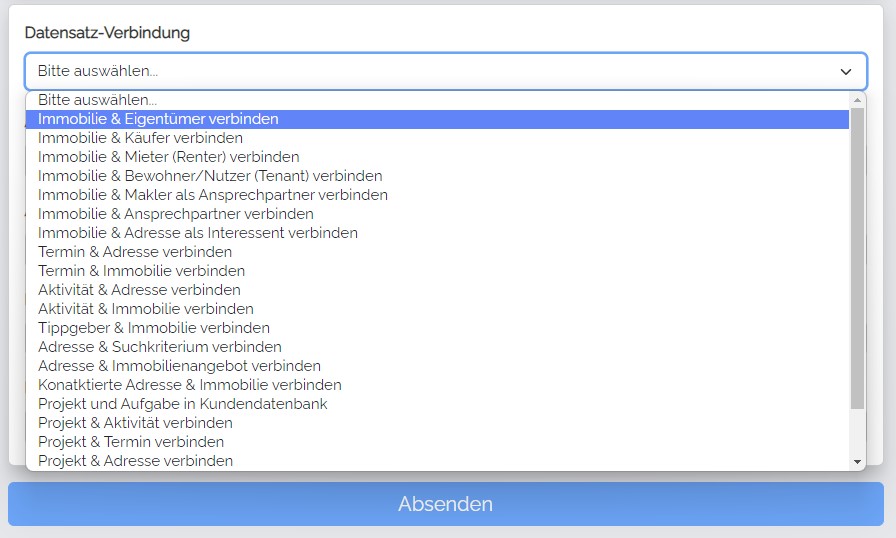
Possible values:
| Value | Meaning |
|---|---|
estate:address:owner |
Property ↔ Owner |
estate:address:buyer |
Property ↔ Buyer |
estate:address:renter |
Property ↔ Tenant |
estate:address:tenant |
Property ↔ Resident/User |
estate:address:contactPerson |
Property ↔ Estate agent as contact person |
estate:address:contactPersonAll |
Property ↔ Contact person (all) |
estate:address:interested |
Property ↔ Prospective buyer |
calendar:address |
Appointment ↔ Address |
calendar:estate |
Appointment ↔ Property |
agentsLog:address |
Activity ↔ Address |
agentsLog:estate |
Activity ↔ Property |
address:estate:tipp |
Referrer ↔ Property |
address:searchcriteria |
Address ↔ Search criterion |
address:estate:offer |
Address ↔ Property listing |
address:estate:contacted |
Contacted address ↔ Property |
project:address |
Project ↔ Address |
project:estate |
Project ↔ Property |
project:agentslog |
Project ↔ Activity |
project:calendar |
Project ↔ Appointment |
project:task:customer |
Project ↔ Task (customer database) |
task:address |
Task ↔ Address |
task:estate |
Task ↔ Property |
> 💡 You will often want to combine the link field with “Forced value” + “Hide field” so that the visitor cannot see it, but the link is still established.